React for Designers: Creating A Simple Sign-Up Screen
Oct 1, 2020
Ok! I'll admit it - I am late to this party. There are tons of React tutorials out there for designers but I am going to try and make this as simple to understand as possible. Even if you have zero to very little coding knowledge. If you learn one new technique from this - I'll take that!
What are we creating?
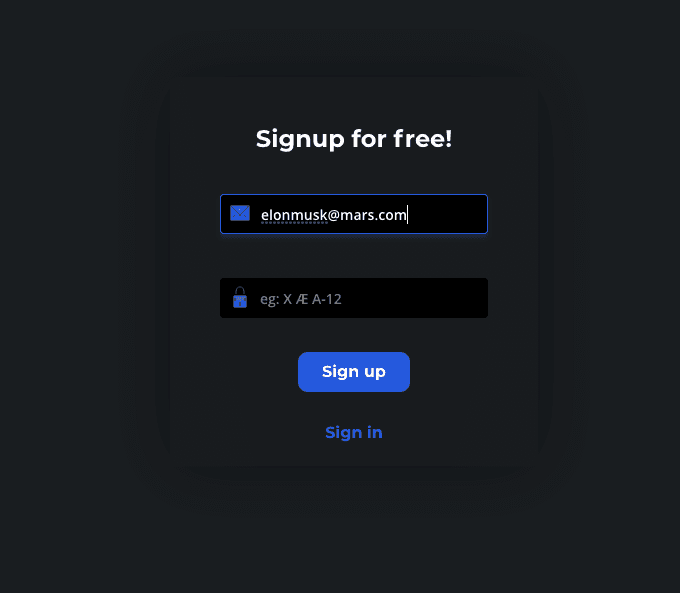
A simple sign up screen. The reason I chose this as a topic to get started is because it helps learn quite a few techniques. You can find the Figma designs here!
What do we need?
No previous coding experience required
A computer
A few hours and some patience 😇
What would we have learnt by the end of this?
Scaffolding using Create React.
Setting up VSCode to scratch the designer itch.
CSS modules in React.
Some sweet CSS text animation. Remember Apple's slide to unlock text animation?
Creating reusable components
Bonus: Simple requests to Firebase to store your authentication credentials.
Setup
Installing Node - the first package we need to install to get started is Node. You can find it here. Fairly straightforward installation!
Download & install VSCode. I prefer to use VSCode for all coding purposes. There are some cool packages that make writing React applications easier.
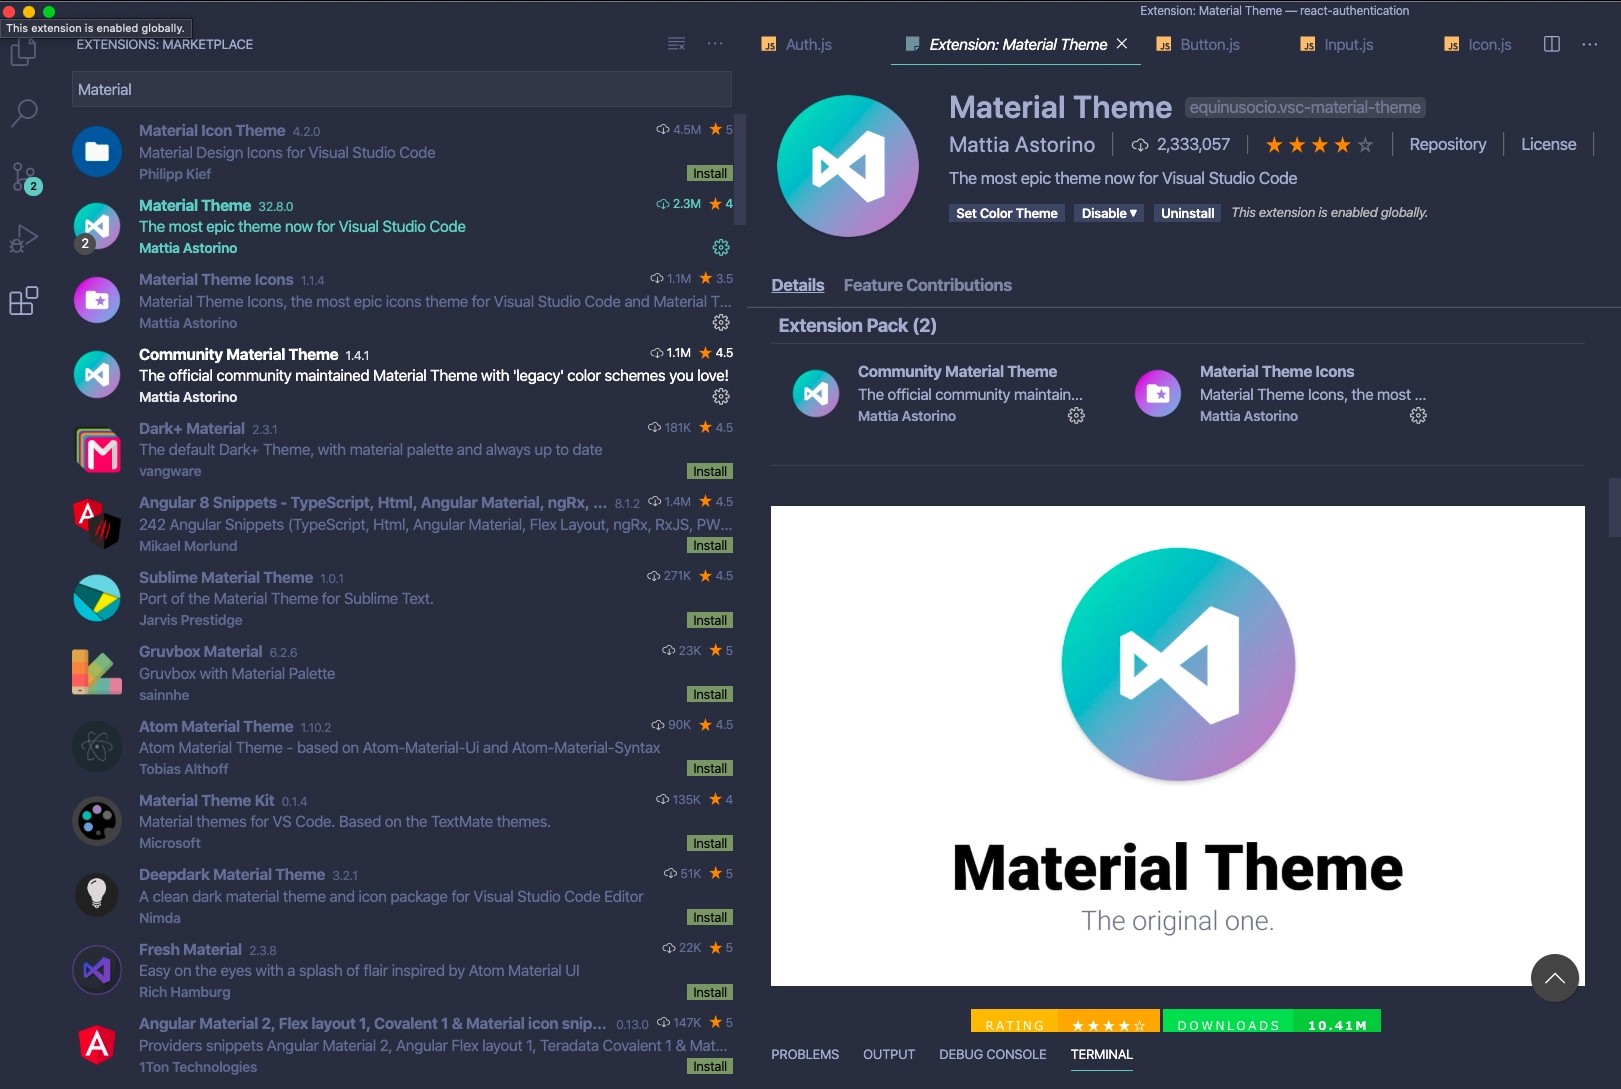
VSCode Setup
Once you have VSCode installed, the first thing I'd like to get started with is setting up the theme!
Theme setup
On the extensions tab (cmd+shift+x), search for Material Theme and install it. I prefer using the Palenight Color Theme but feel free to set any theme that you like.
Running the terminal within VSCode
I prefer using the terminal from VSCode as it is one less window to jump between. You can bring it into view by hitting ^~ (control + ~)
ReactJS Code Snippets
This extension helps autocomplete repetitive blocks of code that one needs to create when creating components. Don't worry, we'll get into it. For now, just search for ReactJS Code snippets and install the one published by charalampos karypidis.
Project setup
Create a new folder either in documents or on your desktop.
On your terminal on VSCode, navigate into the newly created folder with the following command.
cd yourfoldername
Once inside your folder, use the following command to create your first React application (this will create another folder within the folder you just created). My app is called "react authentication" but you can name yours whatever you want.
npx create-react-app react-authentication
Navigate into your newly created react app
cd react-authentication
Once inside, you can run your first React application with
npm start
This should automatically open a new tab in your browser pointing to something like localhost:3000/. And you should be able to see a spinning React logo.
Congratulations, you are running your first React application 🎉.
Open the React folder you just created on VSCode from File -> Open -> Select the React app folder
Your explorer on VSCode should now contain all the subfolders of your application.
CSS Setup
Designers spend a major portion of their time tweaking CSS when writing React apps and it is necessary to have a blank slate to start with. The browsers come with some styles that get in the way of styling your components. To reset this, I use modern-normalize.
npm install --save react-modern-normalize
Open your index.css file that you find under the src folder and import the normalize.css that we just installed.
@import '../node_modules/modern-normalize/modern-normalize.css';
Font Setup
We'll be using two fonts available in Google fonts for this app - Montsterrat & Open Sans. In the public -> index.html file, we will import these fonts from Google Fonts.
<script src="https://gist.github.com/adhithya90/448a5d2e962dff29a65e948a62dc9201.js"></script>
Folder Setup
Create two new folders under src > components and container. You could name this anything, but I like to separate out my UI components from my application containers. Create a folder structure under components and containers as highlighted below. You could name them anything you want except for the CSS files where you'd name them in the format of -
anyname.module.css
Delete the App.css file from the src folder as we will not need that anymore. Also, remove the import line from App.js where we import that CSS file.
Ok! With all that basic housekeeping out of the way, let's get to creating the signup app!
Understanding the structure of the app
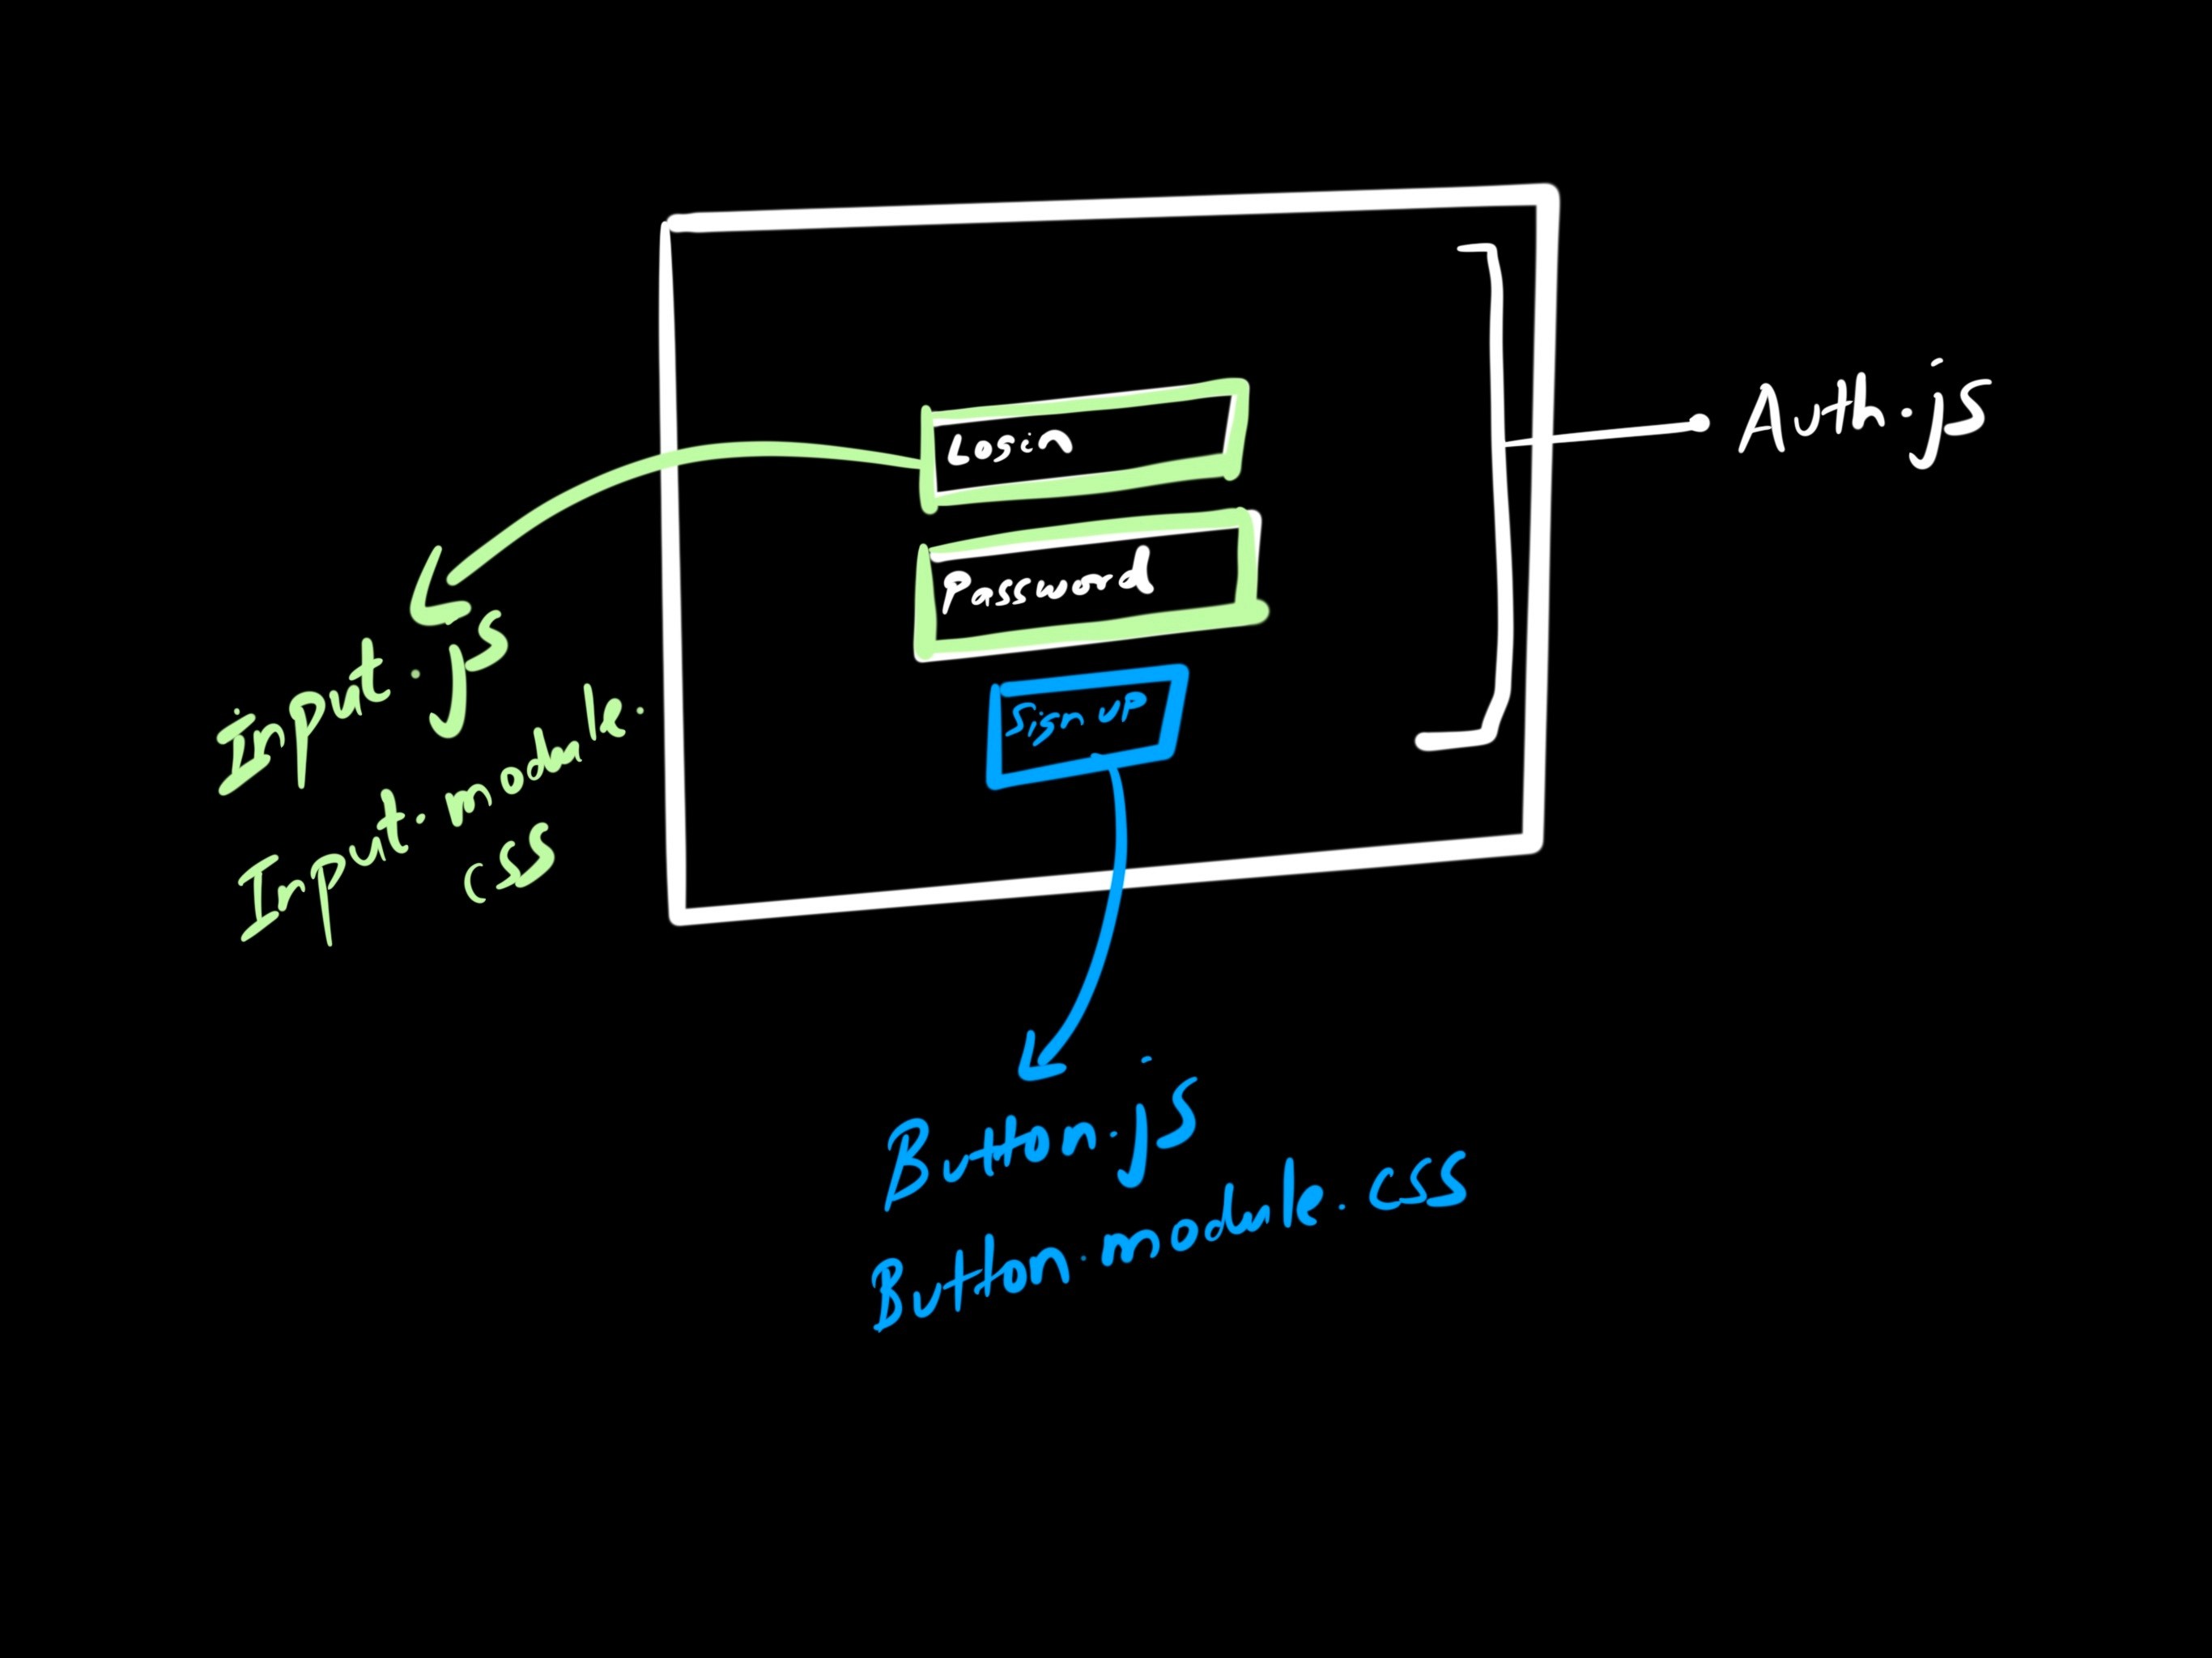
We want a login screen with an input field for email, another for password, and a button to click. This consists of three components -
The login container - Auth.js
The button component - Button.js & Button.module.css
The input field component - Input.js & Input.module.css
Creating your first Component
For this app, all our signup logic is going to reside within the JS file called Auth.js that we just created. This will be a class-based component. We will be managing states within this container and handling the form input as well.
A class-based component can be quickly created with the command
rcc
This makes use of the React Snippet plugin that we installed earlier to create a class based component structure. Within the created div add any content that you would like to print on your app!

Refactor App.js to render your component
Now with your first container created, refactor your App.js file to this -
<script src="https://gist.github.com/adhithya90/306b1667963a891b219139ebc6bbaa45.js"></script>
With App.js now refactored with the Auth.js component being rendered, if you head back to localhost:3000/ you should see just the Hello World on your screen!
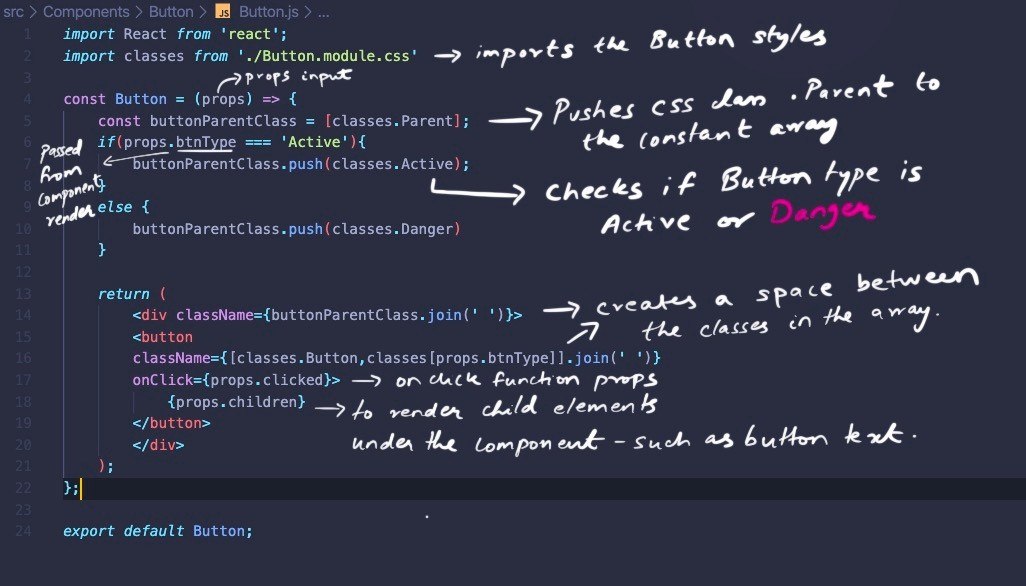
Creating our Button component
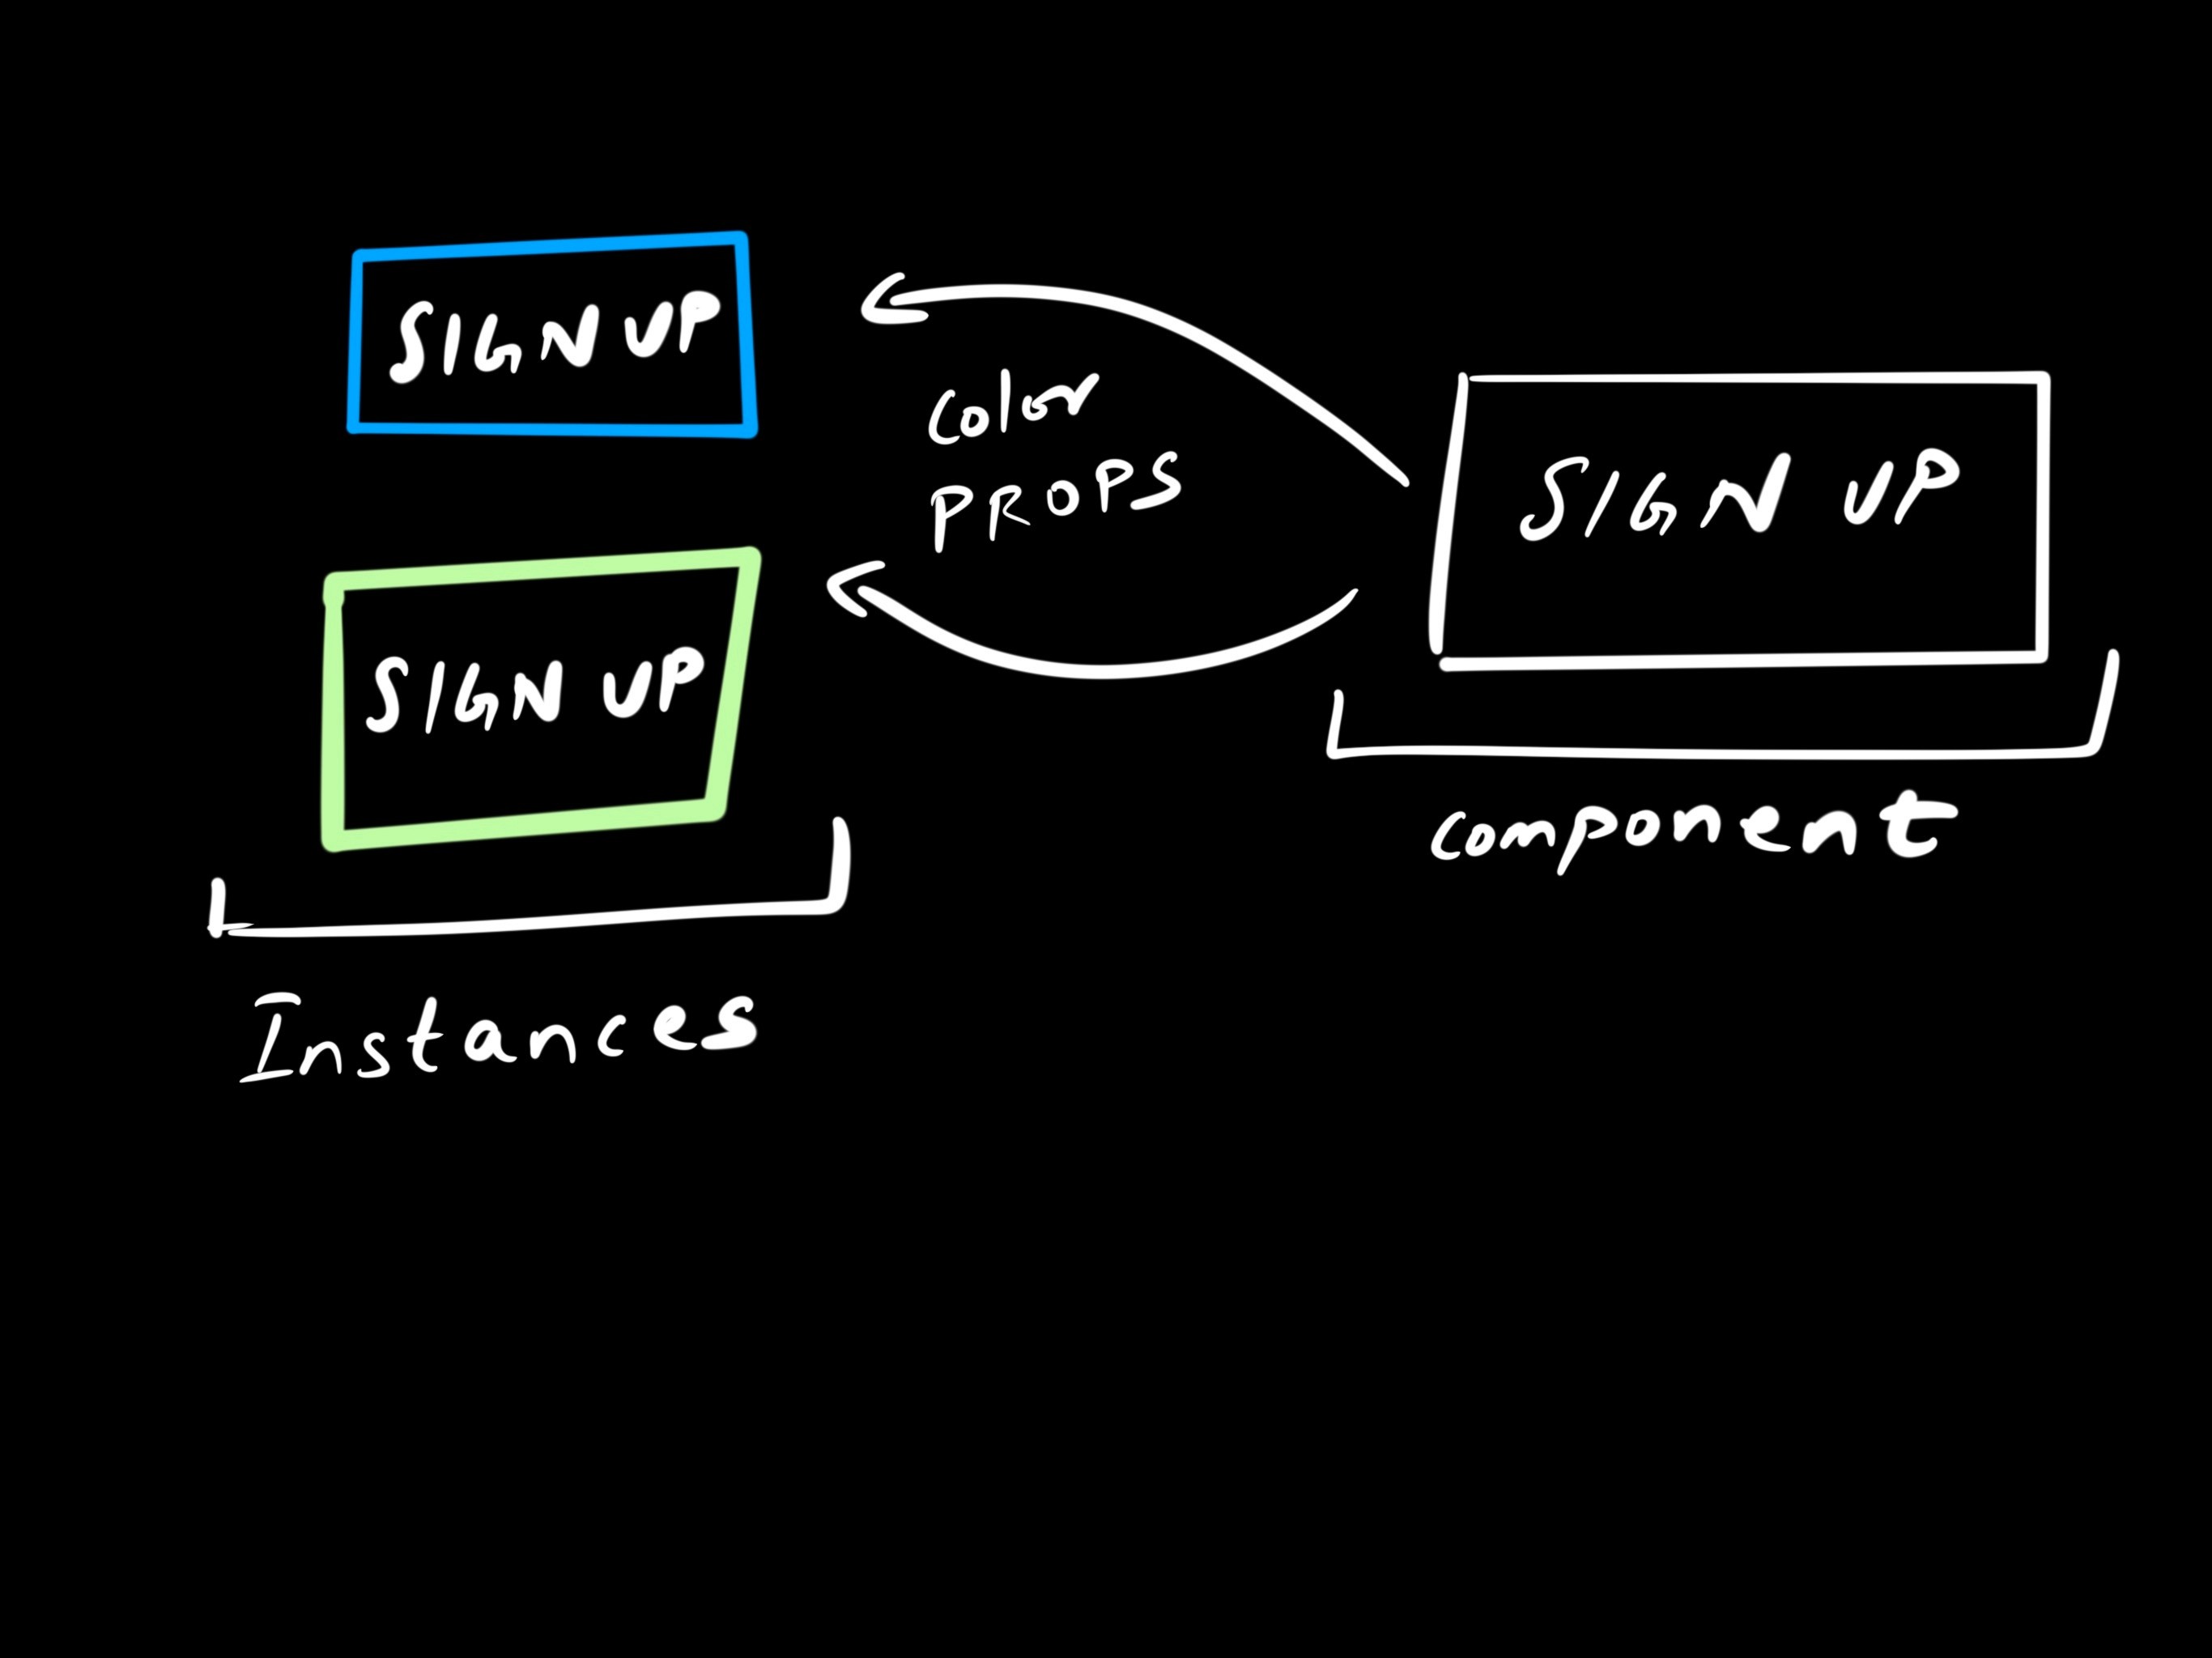
We want to make sure our Button component can be reused anywhere in the app. Just like how we create components on Figma and Symbols on Sketch, we will be creating a React component that can be reused anywhere in the app. The overrides in the world of React are called props - short for properties.
<script src="https://gist.github.com/adhithya90/573092589a54e6ee808df25f5cb32f6c.js"></script>
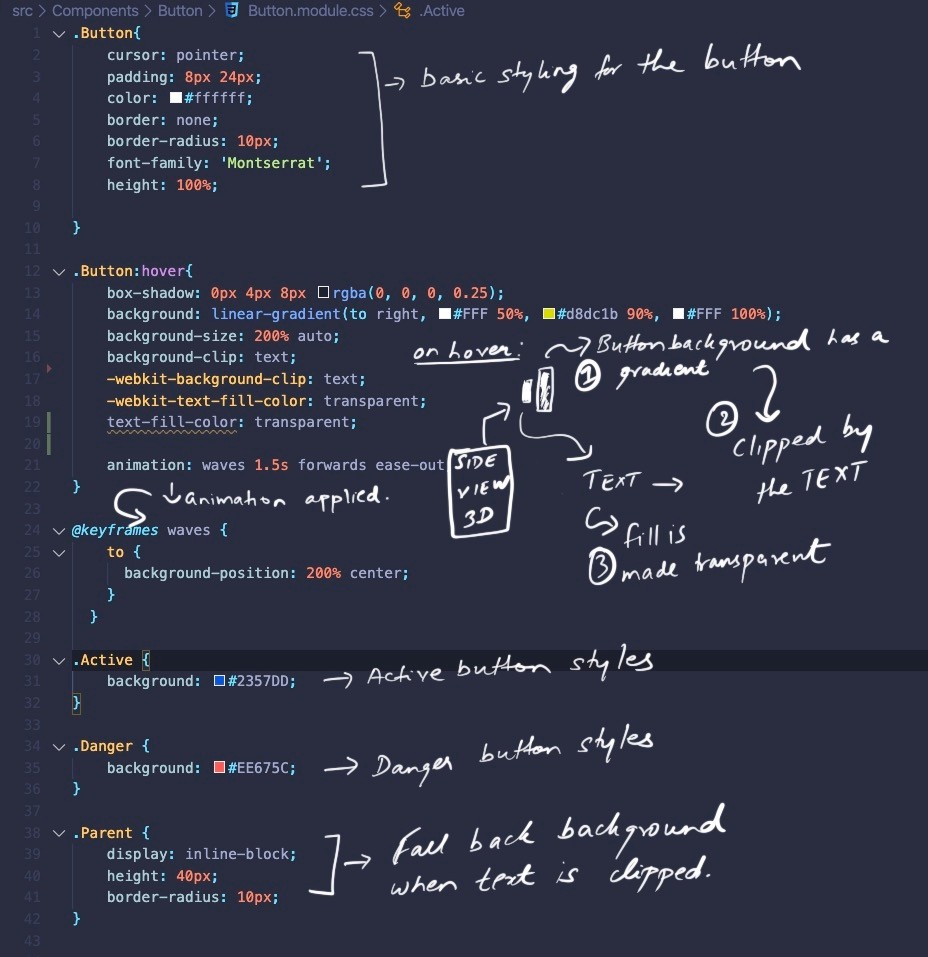
Button.css
We want to create a subtle text animation on hover on our button where there is a gradient that moves within the text from right to left.

<script src="https://gist.github.com/adhithya90/c49530f6bf7255d0feb0f1f7c16cc003.js"></script>
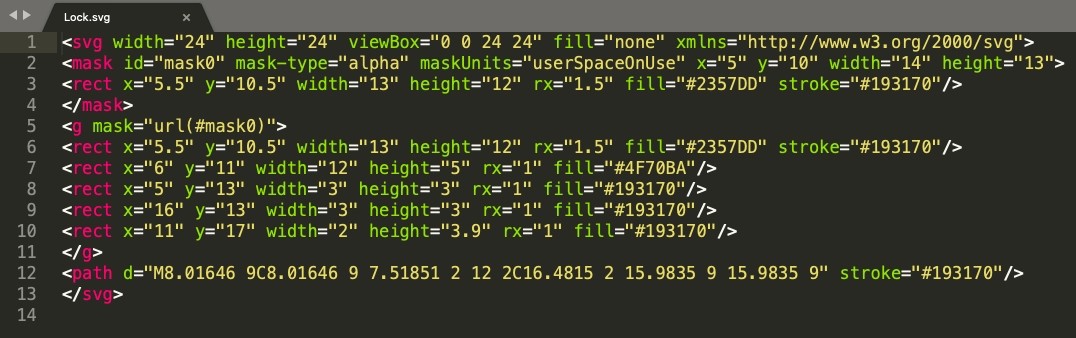
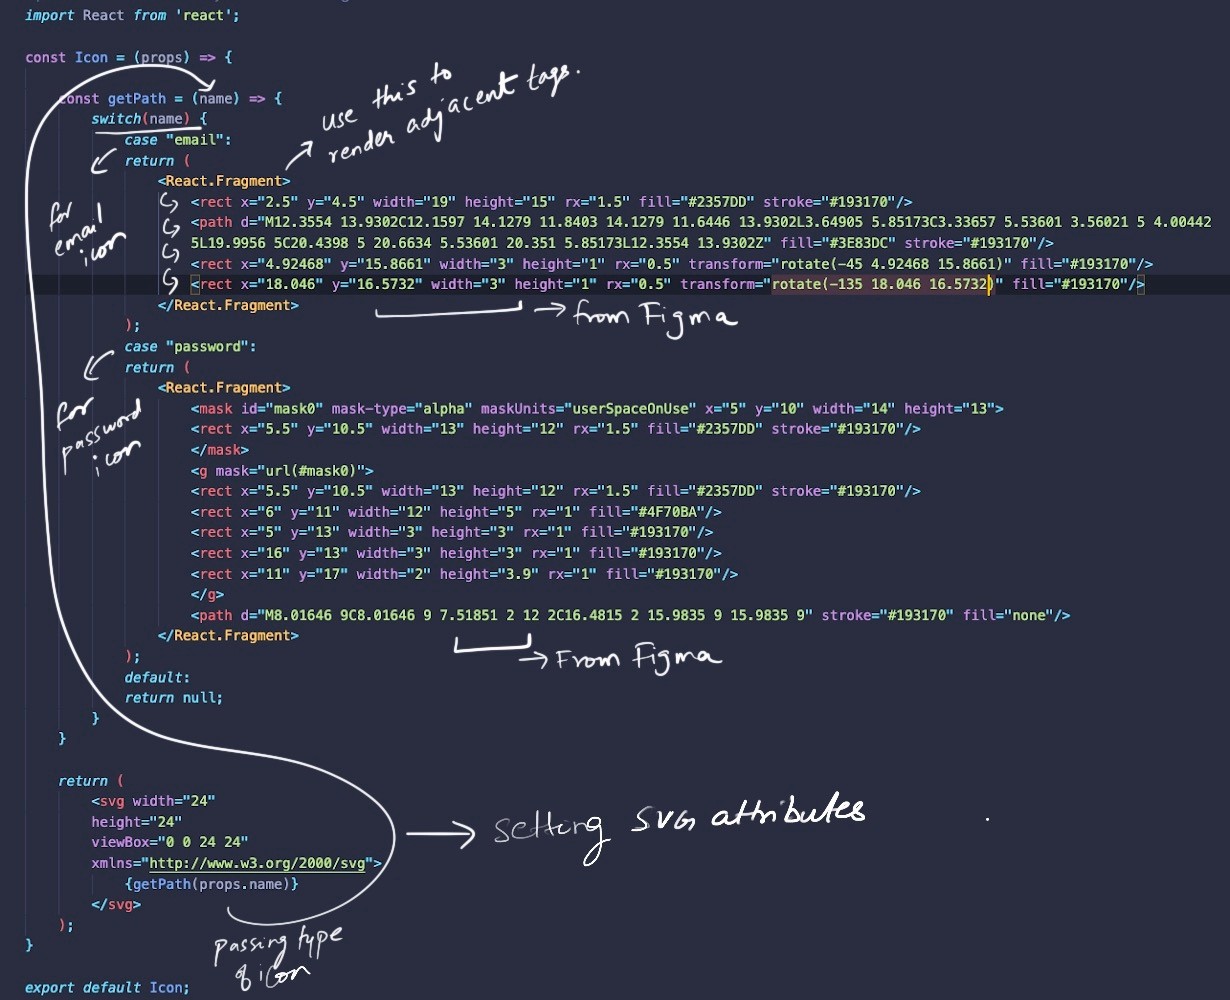
Creating our Icon component
If you notice our input state, it has an icon. We would create this as an SVGIcon component. This way we just pass the type of icon to the input component, which in turn will be created as props.
This looks like a lot of scary code but don't let it fool you. It is just simple SVG attributes that I copy-pasted from Figma. If you downloaded an Icon as an SVG from Figma and open it in a code editor, you'd see something like this -
What we'll be doing is writing a Switch case to determine the type of icon that gets passed on through props and render them accordingly.
Creating our Input component
Input.js
Alright, Input.js is the last component we will be creating for this app before we start rendering it in the Auth.js container. Just like the Button component, the input will have props that it receives from the component call. We also create a parent division and place the input field within it to get the desired styling effect.

Input.module.css
Based on the classes we set on the Input.js file, we write the necessary CSS to switch between valid and invalid states.
Auth.js finally
Now that we have our auxiliary components created, it is time to work on our Auth.js container. Here, we build out the form container layout, we handle and store the input from the user while validating the email & password. This might seem a bit overwhelming to start with but as you read through the annotations in the code, it will start making a lot more sense.
Bonus: Firebase request to save the input to a backend
If you have made it this far, congrats! You have learnt quite a bit on how to create a React app, build reusable components that can be modified based on the props you pass, using CSS modules, and even animating text using pure CSS.
This is a bonus section where we go over how to pass the input to an actual backend. In the code above you might have noticed that I use Axios. Axios is a tool that makes it easy to send HTTP requests to a server - in this case, Firebase.
To get started, use the following command to install Axios.
npm install axios --save
Setup Firebase
Create a new project in your Firebase console. (It's free!)
Navigate into the project and click on Authentication in the left menu.
Create a new Sign-in method and enable Email/Password.
Now, navigate to the cog icon next to the Project Overview section in the left menu. Click Project Settings.
Grab the Web API key and keep it handy.

In your Auth.js file, you can handle an onSubmit event from a user as described above. Replace the text APIKEY with the Web API Key that you found on Firebase. The URL above used is to send a post request for Sign Up - that is, it passed the username and password you enter in the input fields to Firebase. You can read more about the REST API that enables this sign up here. The encryption is taken care of already. Thanks, Firebase!
Alright! With that, you have built your first React app from scratch. There will be places that you will get stuck and that is normal. Here is the link to the entire project on GitHub that you can fork or download to learn from.
Sign up to my journal to have the digests sent to you directly!